A well-planned interior staircase starts with the floor plan, not with the finish: you fix the opening, the layout and the step dimensions first, then choose the balustrade, materials and lighting as one coherent picture. If you are renovating or building a home in Zürich, that order saves you from the most expensive mistake there is, a beautiful stair that doesn't fit the room around it. Our interior architects at Upscale Interiors plan stairs as part of the whole interior, with space planning, technical drawings and 3D visualisations, so you see the result before anything is built.
Below you'll find the decisions in the order you should take them, the Swiss reference points worth knowing, and a few worked examples.
Upscale Interiors
upscale.ch
Plan Your Staircase With the Whole Interior in Mind
Explore Upscale Interiors’ bespoke design approach, from space planning and technical drawings to 3D visualisations for residential spaces.
TL;DR
- Start with the stair's role in the floor plan: where people walk every day, how much length and opening you have, and what the structure allows.
- A comfortable step is roughly a 17 cm riser and a 29 cm tread, and a straight flight is the most natural to climb. Turning and spiral forms save floor area.
- In Switzerland, stair guards are generally at least 0.90 m high under SIA 358, and a stair with more than five treads generally needs a graspable handrail.
- Plan step lighting before joinery and wiring are fixed, so grooves, cables, power supply and maintenance access are part of the design.
- Keep the material palette restrained: structure, tread and handrail are enough.
Start with the room, not the staircase
Before you look at a single stair photo, work out what the staircase has to do. According to the Swiss building magazine Bauenaktuell, planning begins with the stair's role and position in the floor plan, the available space, the daily routes through the home, the structure, the materials, the light and the building rules that apply to the specific project.
In practice, six questions get you most of the way:
- Who uses it, and how often? A stair between a living floor and a bedroom floor is used many times a day, often with laundry or children. A stair to a rarely visited attic can be steeper and narrower.
- What is the starting point? In a Zürich apartment conversion or a villa on the Zürichberg, the floor opening, ceiling height and load-bearing walls are often fixed. Know which ones can move and which cannot before you sketch.
- Where does it arrive? The top of a stair is as important as the bottom. A flight that ends in the middle of a bedroom corridor changes how that floor works.
- What do you see from the stair? It is often the first thing a guest notices in the hall. Sightlines to a window, a piece of art or a garden view are worth planning.
- What is the light like? Daylight from a window or roof light changes how materials look and how safe steps feel.
- What needs to be coordinated? Floor opening, structural system, flight width, connections, materials, balustrade, daylight, artificial lighting and acoustics are all decisions of the early planning stage, as the same source points out.
Write these down on one page. It becomes the brief for everyone who touches the stair: architect, engineer, joiner, electrician and interior designer.
Choosing the layout for your space
The shape of the stair follows the space you can give it. Bauenaktuell's guidance is simple: use a straight stair where enough length is available, consider quarter- or half-turn forms to save space, use landings to create a pause, and expect a spiral stair to need the least floor area.
Two practical points are worth keeping in mind for the Zürich homes we typically see: older buildings often have narrow stair wells, and every extra turn costs usable floor space on each level. A straight flight along a wall can free up a surprising amount of room.
If you carry a flight above a certain number of steps, plan a landing. The draft Swiss standard prSIA 500:2025-07 on barrier-free buildings prefers straight flights and calls for an intermediate landing from 16 risers onward. It is a draft that states it has no validity and must not be applied, so treat it as an orientation for comfort rather than a rule for your project. Your engineer or building authority will confirm what applies to your property.
Step dimensions that feel natural
Comfort on a stair comes down to two numbers: the riser (the height of each step) and the tread (the depth you stand on). The classic rule of thumb is that two risers plus one tread should approximate a natural stride. Bauenaktuell gives about 17 cm for the riser and 29 cm for the tread as a commonly comfortable orientation, and notes that this is not a universal Swiss building-law requirement.
Here is a worked example. Say the finished floor-to-floor height in your Zürich home is 2.80 m (280 cm).
- At a riser of about 17 cm, you need around 16 or 17 risers (280 ÷ 17 ≈ 16.5). Choose 16 risers and each is 17.5 cm, or 17 risers at about 16.5 cm.
- With a 29 cm tread, 17 risers mean 16 treads, so a straight run of roughly 4.64 m, plus the landing at the top.
- That is already a long stair. If your hall is shorter, a quarter-turn or half-turn layout is the natural answer.
The draft prSIA 500:2025-07 mentioned above, written for accessible buildings, points the same way: closed risers, treads of at least 280 mm, risers no higher than 175 mm and tread undercuts no greater than 30 mm. Even though it isn't in force, these figures are a handy yardstick for a stair you want to be comfortable for children, guests and your own later years.
Three details change how a stair feels more than most people expect:
- Open or closed risers. Open risers look light and let light through, but closed risers feel more solid and are the preferred option in the SIA draft.
- Nosing and undercut. A small, clean nosing keeps the line elegant. A deep undercut can catch a toe.
- Headroom. Check the clear height above the stair line all the way up, especially where the flight passes under a beam or the next floor's opening.
This is where drawings matter. In our own projects we work with technical drawings and 3D visualisations, so proportions like these are checked on screen against the actual room.
Designing the balustrade and handrail
The balustrade is the part of a stair people see most, and the part with the clearest safety rules. Two things have to work together: protection and grip.
What the Swiss standard asks for
A summary of the Swiss standard SIA 358 on guards and balustrades, published by the municipality of Bassersdorf, states that:
- ordinary protective elements are at least 1.00 m high, while stair balustrades and guards have a minimum height of 0.90 m, measured vertically from the tread edge;
- openings must prevent falls: for vertical bars the general maximum spacing is 0.30 m, and where children are a special concern, openings below 0.75 m must not admit a 0.12 m sphere.
In plain terms: if you have, or expect to have, small children, choose a balustrade with a tight vertical rhythm or a glass or solid panel. Horizontal rails that can be climbed are a poor match for a family home.
A Swiss court decision reproduced on Treppensicherheit.ch adds a point that is easy to overlook: stairs with more than five treads generally require handrails under SIA 358, and a low parapet does not replace a graspable handrail. A beautiful solid wall alongside the stair therefore still needs a rail you can hold.
Handrail comfort
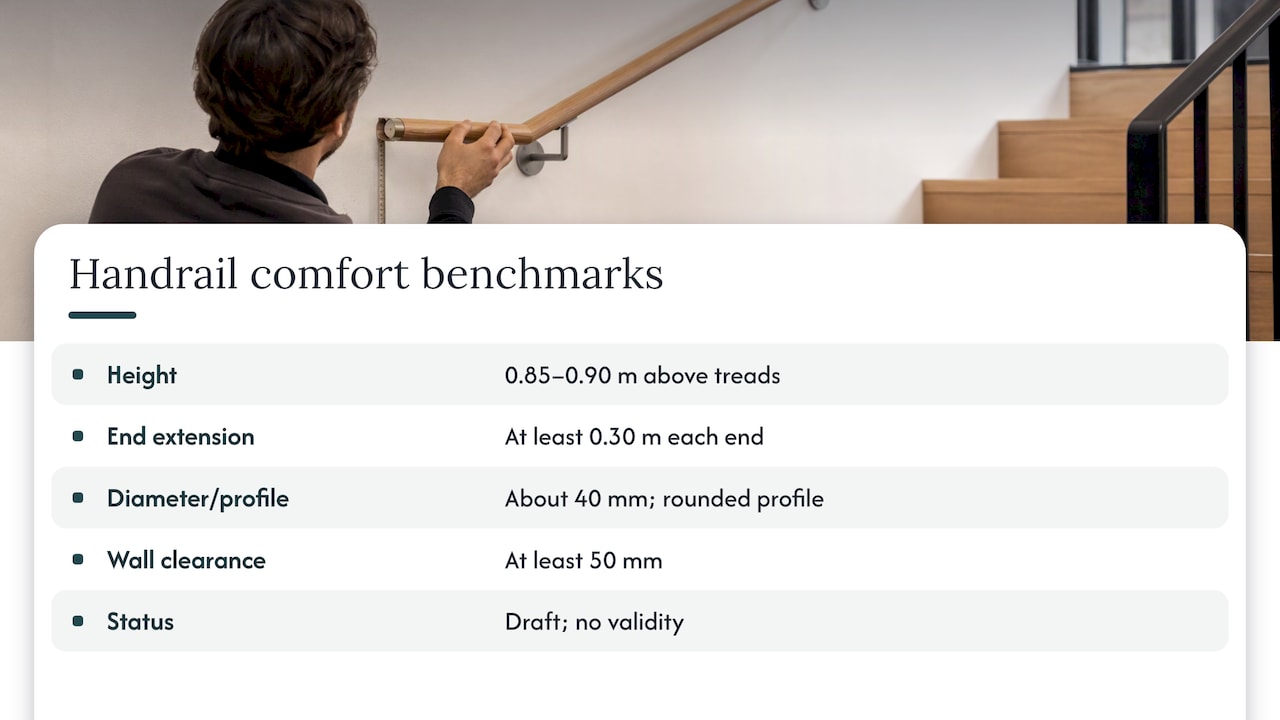
For the handrail itself, the draft prSIA 500:2025-07 gives useful orientation figures for accessible public buildings: a height of 0.85 to 0.90 m above the treads, extending at least 0.30 m beyond both ends, a diameter of about 40 mm, a rounded profile and at least 50 mm of clear distance to the wall. It is a draft with no validity, so we use it as a comfort benchmark: a rail that is easy to grip is one you will actually use.
Matching the balustrade to your interior
Once the safety logic is set, the design is yours. Treads and balustrades can be matched in three ways:
- Quiet and architectural: a slim steel balustrade in the same tone as window frames or skirting, with a timber handrail. It lets the stair recede.
- Glass: keeps a hall bright and open, ideal where you want the view across the room.
- Warm and tactile: oak or ash balusters and handrail that echo the floor and furniture, in a look that suits a family house or an alpine-inspired interior.
If you're curious how this plays out in other rooms, our guide to designing a master bedroom suite in Zürich shows the same principle of choosing a small number of materials and repeating them.
Materials and a restrained palette
Concrete, steel and wood each give a staircase a different character. Concrete feels monolithic and calm, steel is slim and graphic, and wood brings warmth. Bauenaktuell recommends a restrained material hierarchy of three elements, the structural element, the tread surface and the railing or handrail, because too many finishes make a stair look visually fragmented.
Swiss trade coverage of a stair manufacturer in Häuser modernisieren reports that oak is especially popular, and that steel and wood combined with glass balustrades are also popular, with locally sourced beech and oak in frequent use. That matches what a lot of Zürich homeowners ask for: a warm timber tread, a quiet structure and a clean rail.
Some simple pairings that work:
The stair should also sit comfortably with the floor at its foot and the walls beside it. If you have chosen a floor from a design furniture and materials palette, such as warm timber with Italian or Scandinavian pieces nearby, repeat that tone in the treads rather than introducing a new one. Our team's guide to alpine minimalism in St Gallen homes shows how a restrained palette carries a whole house.
Being involved at this stage also matters for acoustics. A hard stair in a hard hall can be noisy; Bauenaktuell lists acoustic control among the early decisions. Think about rugs, wall panels or a timber tread that dampens footsteps.
Step lighting: safe, comfortable and beautiful
Step lighting is the feature that turns a stair from a route into a moment, and it is often the first thing homeowners ask about after the balustrade. It works best when it is planned from the start.
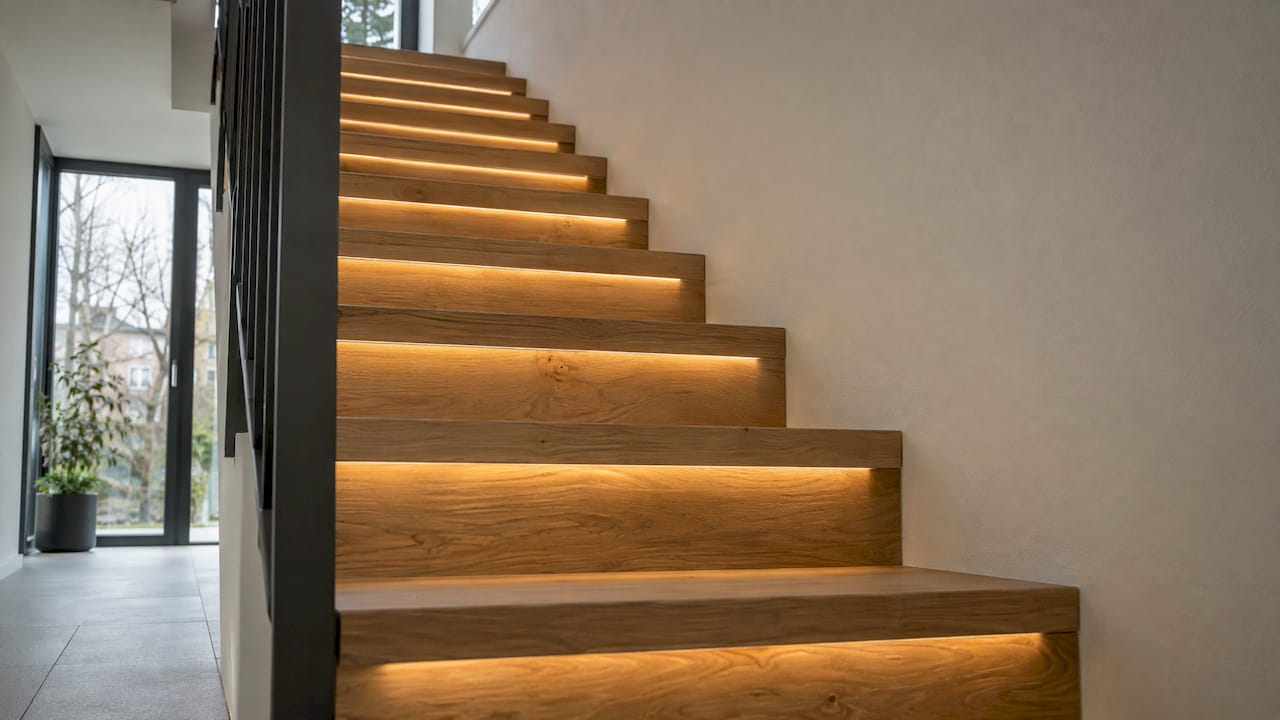
Integrated lighting needs joinery and electrical work to line up. Grooves are machined into the timber before it is finished, cables run inside the structure, the power supply needs a position, and the lights need maintenance access so you can change a driver or strip years from now. If this is left until the end, you end up with surface-mounted cables or lights you can't service.
How bright, and where
For residential stairs there is no single binding lux figure in the research we used, but there is a useful reference from a Swiss specialist in accessible architecture. Hindernisfreie Architektur lists 300 lux as the maintained illuminance for stairs in care and residential-care settings, and recommends both indirect light and enough direct light for the steps to read clearly (modelling). Your home doesn't need to match a care setting, but it is a sensible upper reference for a stair that elderly relatives will use, and a dimmable system lets you move between a bright evening and a soft night mode.
The same source warns about glare: large differences in brightness or reflections can hide details, luminaires should be shielded, and UGR values above 22 (UGR is a standard glare rating) should generally be avoided on stairs and corridors. For a home, that means:
- Don't place a bare, bright spot where you look straight into it as you descend.
- Prefer indirect or shielded light that washes the step surface.
- Avoid glossy treads under strong lights, which reflect and blur the edge.
Three lighting approaches
- Recessed step lights in the wall, at a low height beside the stair, give a soft, even path and are simple to maintain.
- A light line under the nosing or handrail makes the stair look as if it floats. It needs the cabling planned in the structure.
- A pendant or wall washer from above gives general light and shows the stair as a sculpture. Combine it with a low-level layer so the steps themselves are lit.
Whichever you choose, put the light on a separate circuit or scene in your lighting control, with a sensor or a night preset, so the stair is lit gently at night.
A planning order that works
Here is the sequence we suggest for a stair in a renovation or new build.
- Brief and measurements. Record floor-to-floor height, opening size, structural limits and everyday routes. Our consultation is a good point to do this with a designer.
- Layout options. Draw two or three layouts at scale and test them against furniture on each floor.
- Step geometry. Work out risers and treads, landings and headroom.
- Safety elements. Define the balustrade height, openings and handrail early, and check the details with the engineer or the building authority.
- Materials. Choose the three elements, and match them to the floor, walls and joinery.
- Lighting and wiring. Fix the grooves, cables, power supply and access before the joiner starts.
- Visualise and approve. Review 3D views and the technical drawings together before ordering.
Steps 1, 2, 5 and 7 are where an interior architect makes the biggest difference: space planning tests the layouts against how you really live, material selection keeps the palette restrained, and 3D visualisations let you walk the stair before it exists. If you want to know how this fits into the wider project, see our overview of the Swiss interior design timeline.
Our perspective
A staircase is the one piece of your home that you touch with your hands and feet every single day, and it is also the first thing guests see. That's why we never treat it as a separate item on a list.
At Upscale Interiors we bring architecture and interior design together, so the stair is planned with the floor plan, the materials and the light from day one. Over 480 completed projects have taught us to bring the dots together early: a rail that feels good, a tread that matches the floor, a light that makes the evening feel cosy.
Our space planning, technical drawings and 3D visualisations let you see the proportions, and our project management keeps joiners, electricians and suppliers on the same page. With access to over 185 furniture brands, we can also match the stair to the pieces you love, from Italian classics to Scandinavian design, so the whole home feels just wow.
Giorgia D'Amico
Start with a consultation or a full-home package
If a stair is one part of a larger renovation or new interior, our Full Home Package for CHF 3,390 covers the whole home, while the Single Area Package for CHF 970 suits a single space such as a hall or stair area. If you would like a first conversation about your plans, you can book a Consultation for CHF 490. All three are described on our interior design packages page, and for larger or more complex projects you can ask for an individual offer there as well. We work online and in person, so Zürich homeowners and expats can start from wherever they are.
FAQ
How wide should an interior staircase be?
The width depends on how the stair is used and on the building rules for your property. The research we used gives no single residential width, but it names flight width as an early planning decision together with the floor opening and structure. Decide it with your architect or designer, and check what the building authority requires for your project.
How high does a stair balustrade have to be in Switzerland?
According to a summary of SIA 358, stair balustrades and guards have a minimum height of 0.90 m, measured vertically from the tread edge, while ordinary protective elements are at least 1.00 m. Stairs with more than five treads generally also need a graspable handrail. Check the details for your building with your engineer or the authority.
What is the most comfortable step size?
A commonly cited orientation is a riser of about 17 cm and a tread of about 29 cm, where two risers plus one tread approximate a natural stride. It is a rule of thumb rather than a universal legal requirement. Your floor-to-floor height determines how many steps you need and how long the stair becomes.
When should I plan step lighting?
Before the joinery is finished. Grooves for integrated lights are machined into the timber, cables are routed inside the structure and the power supply and access for maintenance need a position, so the lighting has to be part of the first drawings. Choose shielded or indirect light to limit glare.
Which materials suit a stair in a Zürich home?
Oak, steel and glass are popular combinations in Switzerland, and a restrained palette of structure, tread and handrail keeps the stair calm. Match the tread tone to your floor and the rail to your windows or joinery, and the stair will feel like part of the room.
Sources
- Treppen als Gestaltungselement: Proportionen, Materialien und Raumwirkung richtig planen, Bauenaktuell.ch
- SIA-Norm 358: Geländer und Brüstungen, Gemeinde Bassersdorf
- Court decision on stair handrails under SIA 358, Treppensicherheit.ch
- Licht in Alters-, Wohn- und Pflegeeinrichtungen, Hindernisfreie Architektur
- Präzision auf Schritt und Tritt, Häuser modernisieren
Recommended
- Office Fit-Out Planning in Zürich
- Quiet Luxury Interiors: How to Furnish Your Zürich Home
- Reception Area Design in Zürich: Planning an Office Entrance
- How to Design a Master Bedroom Suite in Zürich