A good walk-in wardrobe starts with a tape measure and an honest look at what you own, not with a catalogue. Measure the room, count what you actually hang and fold, choose a layout that leaves room to move, and plan the lighting before the first shelf goes in. This guide takes you through each step, with a focus on Lucerne homes, where lake-view apartments, townhouses and attic floors all call for slightly different answers.
Upscale Interiors
upscale.ch
Plan a Wardrobe Around Your Space
Upscale Interiors provides space planning, material selection and 3D visualizations for bespoke residential interiors in Switzerland and Europe.
TL;DR
- Measure the room at several points and note sockets, doors, windows and radiators before you sketch anything.
- For hanging on both sides with a walkway between, plan on a room roughly 2 metres (6.5 to 7 feet) wide.
- Plan the interior from your real inventory: hanging, folding, shoes and accessories each need their own zone.
- Treat lighting as part of the design. Build it in early, and leave new wiring to a qualified electrician.
- Sloping ceilings are not a problem. Low zones suit shoes, drawers and low units, and tall hanging goes where the height is.
Start with the room, not the furniture
It's tempting to fall in love with a finish or a brand first. We'd gently suggest you resist that for a day or two, because the room decides most of what is possible.
Grab a tape measure, a notepad and your phone, then record the following:
- Width at three heights. Walls are rarely perfectly straight, especially in older Lucerne buildings. Measure at floor level, mid-height and ceiling, and plan with the smallest figure.
- Height at both ends and in the middle. Floors and ceilings can slope slightly, and skirting boards count.
- Doors and windows. Note which way each door swings and where the window sits, since that decides where tall units can stand and where light comes from.
- Sockets, switches, radiators and vents. These are easy to forget and expensive to move later.
- Anything that can't change. Beams, chimney breasts and pipes all shape the layout.
A quick sketch with measurements, even on squared paper, is far more useful than a perfect drawing you never finish. Take photos of every wall as well. They will help whoever builds your wardrobe, and they will help you remember the room when you are choosing finishes weeks later.
Which room are you really working with?
A walk-in wardrobe isn't always a separate room. In practice, we see four situations:
- A spare room or box room converted into a dressing room. This gives you the most freedom.
- A walk-through zone between the bedroom and the bathroom. Here, circulation matters as much as storage.
- An alcove or niche in the bedroom, closed off by doors or a curtain, or left open.
- An attic or sloping-ceiling space, which can be lovely but needs smart planning (more on that below).
Be honest about which one you have. A wardrobe that works beautifully in a spare room can feel cramped in a corridor, and an open concept needs a tidier habit than a closed one. If you are unsure whether a space is big enough, a designer can often tell you in one visit, which saves you from buying units that will never fit.
How much space do you need?
The classic question, and the honest answer is: it depends on the layout. A few anchors help.
To hang clothes on both sides of a central walkway, a walk-in wardrobe should be roughly 6.5 to 7 feet wide, which is about 2 metres. Narrower than that and you can still make it work with a single-sided or L-shaped layout, with hanging on one wall and drawers on the other.
Here is how the common layouts compare:
Whatever the shape, protect the walkway. You need to open a drawer fully and still stand in front of it, and you need to turn around with an armful of clothes. If a layout feels tight on paper, it will feel tighter at 7 a.m. on a Monday. As a rule of thumb, designers aim for a clear zone of around 75 to 80 cm in front of drawers, and more if two people dress at the same time.
Plan the inside from your real wardrobe
This is the step most online planners skip, and it's the one that makes the difference between a wardrobe that looks great on day one and one that still works in year five.
Before you choose any fittings, sort your clothes into groups and count them:
- Long hanging: dresses, coats, long skirts
- Short hanging: shirts, blouses, jackets, folded-over trousers
- Folded: knitwear, T-shirts, jeans, sportswear
- Drawers: underwear, socks, belts, small items
- Shoes: by height, because boots and heels need different shelf space
- Accessories: bags, hats, jewellery, watches, scarves
Then convert each group into a measure, such as metres of rail or number of shelves. Add around 20 per cent for the things you'll buy in future. It's a simple habit, but it prevents the classic regret of a beautiful wardrobe that is full within a year.
Hanging, shelves and drawers
A few practical figures help when you discuss the plan with a joiner or designer:
- Shelves for everyday clothes, shoes and boxes work well at about 12 to 16 inches deep, which is roughly 30 to 40 cm.
- Hanging clothes normally need around 60 cm of depth if the rail runs front to back. In shallower niches, a side-facing rail can work, though it holds less.
- Drawers need more height than you'd think for knitwear, and much less for underwear and socks. Mixing drawer heights in one column makes better use of the space than identical drawers.
Two small design choices often pay off. First, put your most-used items between hip and eye height, where you don't need to bend or reach. Second, keep one "flex" zone, such as an empty shelf or a rail section, so the system can adapt when your life does.
Light your dressing room properly
Good lighting is where a wardrobe starts to feel like a boutique rather than a cupboard. It's also one of the most common things people leave until the end, when ceilings are closed and sockets are fixed.
Think in layers:
- General light for the room itself, usually from the ceiling, evenly spread so no corner is dark.
- Task light inside the units, along rails, over drawers and shelves, so you can see what you own without casting your own shadow on it.
- A mirror zone with soft, even light on your face and body, ideally from the sides or front rather than only from above.
A few details are worth deciding early:
- Colour of the light. Warm white feels cosy, while a more neutral white helps you judge colours. Many people choose a neutral-warm tone and test it on a navy sweater versus a black one before committing.
- Sensors. Light that switches on when you open a door or drawer is a small luxury you will use daily. Many systems can also be dimmed, so you can have a bright mood for choosing and a softer one for the evening.
- Where cables run. Planning the routes before the joinery is made means no visible wires and no drilling afterwards. We go into this in more detail in our piece on lighting, cable routing and bespoke joinery.
What you can do yourself, and what needs a professional
Switzerland is strict about electrical work, and rightly so. According to the federal electrical inspectorate (ESTI), residents may mount and remove light fittings and the associated switches in the rooms they occupy and their ancillary rooms, while other installation work generally requires an ESTI permit. Some work done by non-professionals must also be checked by a holder of a control permit, who issues a safety certificate.
In plain terms: hanging a new fitting on an existing connection is one thing, and adding circuits, moving sockets or wiring built-in strip lighting is another. If your plan involves the second kind, ask a licensed electrician to do it and agree the lighting positions with your designer first. If you rent, check with your landlord before changing anything.
Planning under a sloping ceiling
Attic floors and top-floor apartments often have the nicest light and the trickiest geometry. The good news is that a sloping ceiling isn't a dead end, because every zone has a natural use.
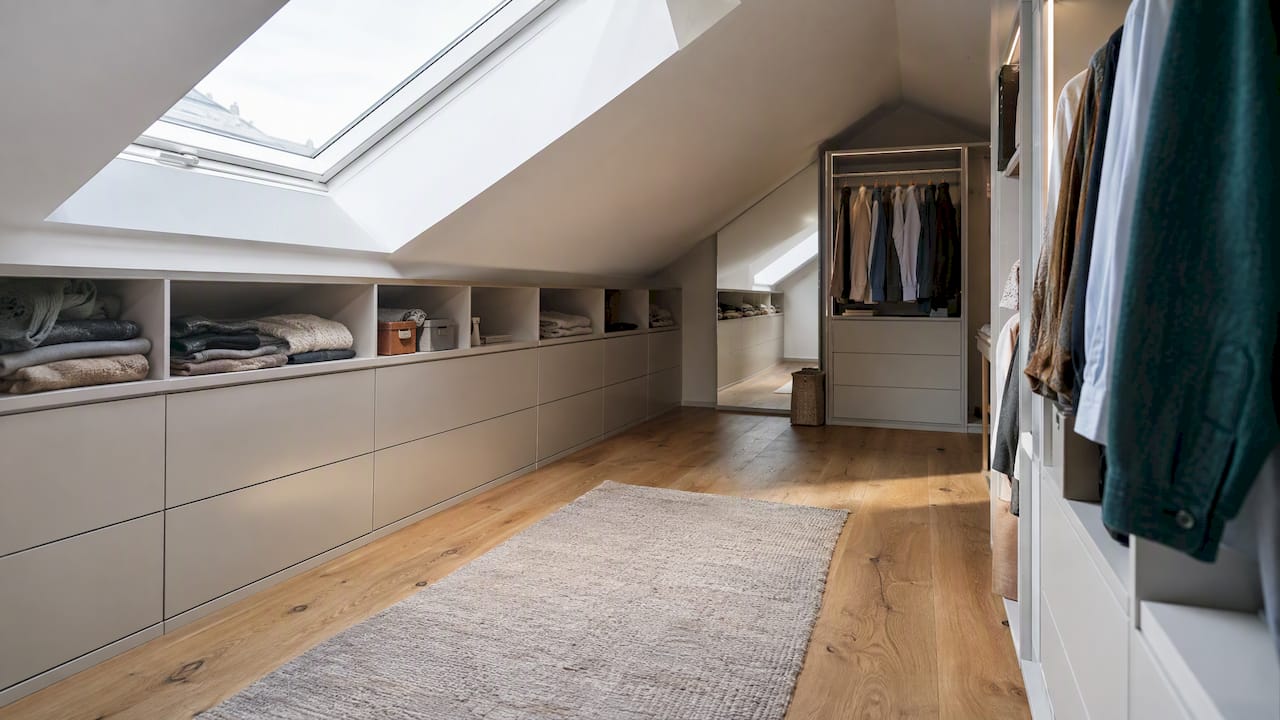
First, measure the full room height and the knee-wall height, which is the vertical wall before the slope begins. As VELUX's guide to wardrobes under sloping ceilings points out, both figures are decisive, and a rail suits the places where lots of clothes hang, while stepped shelves, shoe racks, low chests and lowboards use the lower areas.
In practice, that means:
- Tall zone: long hanging and tall units where you can stand upright.
- Middle zone: shirts, jackets and trousers on a shorter double rail.
- Low zone: shoes, drawers, boxes and folded items.
- Under the eaves: pull-out boxes or low doors for seasonal storage.
The same logic of using awkward space applies elsewhere in the home. If you're curious, there are good ideas on storage under sloped ceilings and stairs that translate well to a dressing area. Because the angles are never standard, bespoke joinery tends to pay for itself here: it follows the slope to the centimetre rather than leaving gaps.
Open, with doors or behind a curtain?
This is partly taste and partly practicality.
- Open systems feel light and boutique-like, and everything is visible. They work best in a separate room or a well-ventilated niche, and they reward tidy people.
- Doors hide the mess and protect clothes from dust and daylight. Hinged doors need swing space, while sliding doors save floor area but allow access to only part of the unit at a time.
- Curtains are a soft, budget-friendly option for niches, though they add little in the way of protection.
A hybrid often works best: open hanging for the clothes you love to see, and closed drawers or doors for everything else.
What does it cost?
Budgets vary widely, and the honest answer depends on size, materials, fittings and lighting. As a starting point, simple built-in solutions are often quoted at a few thousand francs, while fully made-to-measure wardrobes run well into five figures. Add a buffer for the unexpected, since walls and ceilings can reveal surprises during installation.
The biggest cost drivers are:
- Custom joinery versus modular systems
- Surface and front materials such as glass, mirror, solid wood or lacquer
- Integrated lighting and electrical work
- Accessories such as pull-outs, valet rods and jewellery inserts
- Delivery, assembly and any adjustments to the room itself
If you're deciding between modular and custom, compare like with like: ask for the same layout, materials and lighting from each supplier, then compare the full price rather than the headline figure.
Our perspective: plan the wardrobe as part of the home
At Upscale Interiors, we combine architecture and interior design, and that shapes how we look at a dressing room. A wardrobe is never just a piece of furniture. It touches the floor plan, the electrics, the lighting, the flow between bedroom and bathroom, and even how the whole home feels when you wake up.
That's why we like to start with the space and the person using it. We look at how you dress, what you own and what annoys you today, then bring the dots together: layout, joinery, materials, lighting and furniture. With over 480 completed projects and access to a network of more than 185 furniture and design brands, we can combine bespoke built-ins with the right free-standing pieces, such as an ottoman, a mirror or a chair, so the room feels finished rather than assembled.
Our advice, if you only remember one thing: be generous with the planning and modest with the decoration. A well-planned wardrobe with simple fronts will always beat a showy one that doesn't fit your life. And if you can see your plan in 3D before anything is built, you will catch the awkward corner or the missing socket while it's still easy to fix.
If you're curious how this looks in practice, our article on custom dressing room design for luxury homes in Lucerne shows what is possible, and it makes a good source of inspiration whether your home is a lakeside villa or a city apartment.
— Giorgia D'Amico
A six-step plan you can follow this month
- Measure and photograph every wall, plus sockets, windows and doors.
- Inventory your clothes and convert them into metres of rail, shelves and drawers.
- Choose the layout that suits the room: single wall, L, U or island.
- Decide on doors, open fronts or a mix.
- Plan lighting and cables before anything is made, and book a licensed electrician for new wiring.
- Get a visual of the finished design, then compare quotes on the same specification.
Want help with your own dressing room?
If you'd like a second pair of eyes, we'd be delighted to help. Our online interior design packages are a simple way to start: the Consultation costs CHF 490, the Single Area Package (ideal for one dressing room or bedroom) costs CHF 970, and the Full Home Package costs CHF 3,390. If your project is bigger or more complex, we can prepare an individual offer, and we work with clients in Lucerne and across Switzerland, both online and in person.
FAQ
How big should a walk-in wardrobe be?
For hanging on both sides with a walkway in between, aim for a room about 2 metres wide, or 6.5 to 7 feet. Smaller rooms work well with a single-wall or L-shaped layout. What matters most is a comfortable clear area in front of drawers and doors.
What do you need for a walk-in wardrobe?
You need a room or niche with enough space to walk and turn, plus a plan for hanging, shelves, drawers, shoes and accessories. Good lighting, ideally with sensors, and a mirror zone make it feel complete. Allow for ventilation if you choose closed fronts.
Can you build a walk-in wardrobe under a sloping ceiling?
Yes. Measure both the full height and the knee-wall height, then use the tall area for long hanging and the low areas for shoes, drawers and low units. Bespoke joinery follows the slope exactly, so little space is wasted.
Can I install the wardrobe lighting myself?
In Switzerland, residents may mount and remove light fittings and their switches in the rooms they occupy, but other installation work generally needs a permit. For new circuits or built-in lighting, hire a licensed electrician and agree the positions with your designer beforehand.
Sources
- Walk-in Closet Dimensions: How Big Your Wardrobe Should Be (Livingetc)
- Verkauf von Elektromaterial und Laieninstallationen (ESTI)
- Begehbarer Kleiderschrank unter der Dachschräge (VELUX Magazin)
Recommended