.svg)

For a vanity that survives Rüschlikon’s lake-effect humidity and actually fits your walls, hire a bespoke interior design service that handles on-site measurement, 3D planning, moisture-resistant material selection, and installation as one coordinated project. That single decision heads off the two most common vanity failures: pieces that swell at the seams within a year, and cabinets that never quite fit the wall they were bought for.
Custom Bathroom Vanity Design in Rüschlikon starts long before you pick a finish. Here’s what to do today:
- Take current photos of your bathroom, including the ceiling, floor, and any exposed pipes.
- Note rough width, height, and depth of the space, plus a realistic budget range.
- Book a consultation with a designer who can turn those rough notes into a real plan.
Get this right and you end up with a tailor-fit vanity, moisture-safe finishes, and storage built around how you actually use the room, not a generic showroom layout.
Key Takeaways
A durable custom vanity depends on professional on-site measurement, moisture-sealed finishes, and a coordinated design-to-install process rather than any single material choice.
Which Materials and Finishes Hold Up in a Humid Bathroom?
The finish matters more than the base panel. Geberit’s own research on bathroom furniture confirms that wood-based furniture varies widely in moisture sensitivity, but high-quality sealing, whether lacquer, veneer, film, or melamine, can make almost any of them perform well in a wet room. A cheap panel with excellent sealing often outlasts a premium panel with sloppy edge work.
Your realistic options:
- Melamine and laminate: budget-friendly, easy to clean, weakest at the seams if edging is poor.
- Lacquered MDF: smooth, contemporary look, wide color range, needs careful factory-grade lacquer rather than a site-applied coat.
- Veneered plywood: warmer aesthetic, good stability, but relies entirely on the quality of the sealed finish.
- Solid wood, properly sealed: the most premium feel, the most finish-dependent for longevity.
- Glass-front elements: sleek and wipeable, though they show water spots faster than matte finishes.
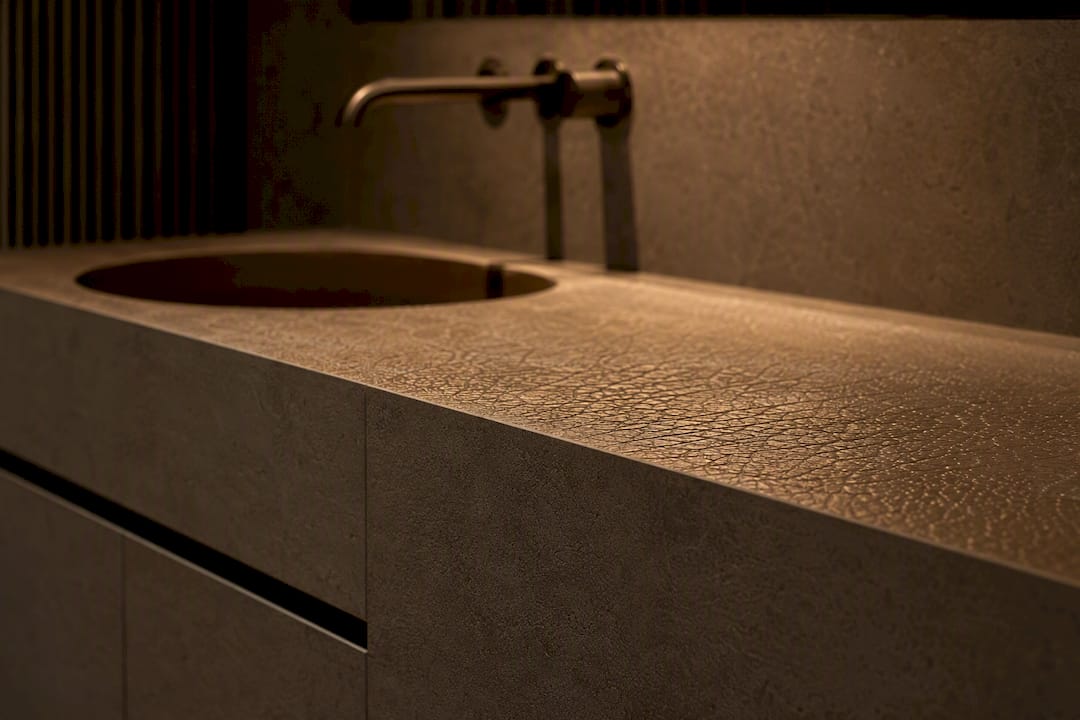
- Stone or composite tops: Corian, quartz, and similar surfaces resist staining and moisture almost completely.
Pro Tip: Avoid ammonia-based cleaners on lacquered or veneered surfaces. They dull the sheen over time and can shorten a finish’s lifespan well before the cabinet itself wears out.
Poor sealing, not the underlying panel type, is the main reason engineered wood furniture fails in wet rooms over time. LAUFEN’s product guidance reinforces this: its broad lacquer palette exists specifically so cabinetry can match basins without sacrificing durability. Reseal exposed edges every three to five years in a well-ventilated bathroom, sooner if you notice dulling near the sink cutout.
How Do You Measure a Bathroom for a Custom Vanity?
Off-the-shelf vanities fail most often at the wall, not the finish. Swiss homes, especially older lakeside properties around Rüschlikon, frequently have walls that are out of plumb by more than a few millimeters, plus pipework in places a catalog cabinet was never designed to clear.
- Have a designer measure on-site, not just you with a tape measure. Professional tolerances catch wall deviation, floor slope, and pipe placement before they become install-day surprises.
- Map every fixed point: water inlets, drain position, electrical outlets, and any window sill or radiator that limits cabinet depth.
- Decide floating or floor-mounted early, since it changes the plumbing plan, not just the look.
- Confirm clearances: at least 60 centimeters of open floor in front of the vanity, and roughly 90 centimeters between the vanity edge and any door swing.
Irregular walls or exposed pipes aren’t a dead end. A joiner working from real measurements can build a scribed side panel or an offset plinth that hides the discrepancy entirely, a solution no factory-made cabinet offers.
Floating vanities have become the default recommendation in bespoke Swiss projects for good reason: they make the floor easier to clean, they visually open up a small room, and they conceal plumbing behind a clean panel. Floor-mounted units, by contrast, suit larger bathrooms where extra base storage outweighs the airy look.
Pro Tip: If your bathroom is under four square meters, ask your designer to model a floating vanity first. The visual gain in perceived space is often more noticeable than any change in storage.
What Storage Features Actually Improve Daily Use?
A bespoke vanity earns its price in the details you touch every day, not the finish you see once. Geberit’s design guidance points to moisture-resistant construction paired with smart internal organization as the combination that reclaims real usable space inside drawers.
- Custom drawer inserts separate cosmetics, hair tools, and cleaning supplies instead of piling them into one shared cavity.
- Siphon-aware drawer design either cuts a notch around the pipe or shifts the plumbing slightly off center, so the top drawer keeps most of its depth instead of losing it entirely to the siphon.
- Soft-close and push-to-open hardware reduce wear on cabinet fronts and keep the vanity looking new for years.
- Integrated LED lighting under cabinets or around mirrors adds task light without visible fixtures, and demister-backed mirrors solve the fogged-glass problem after every shower; see this guide to the best bathroom vanity lights for practical options and placement tips.
- Low-profile LED strips inside drawers help you see contents clearly, a small touch that makes a big difference in a windowless powder room.
These features cost more up front than a stock cabinet, but they’re also why a well-built bespoke vanity keeps functioning smoothly a decade later, while budget units start sagging on their hinges within a few years.
What Does the Design-to-Install Process Look Like?
A structured process is what separates a vanity you love from one you tolerate. Custom-vanity projects generally move through five stages, and knowing them in advance helps you set realistic expectations for both time and cost.
- Consultation and brief. You share photos, rough dimensions, style preferences, and a budget range. This is also where a style quiz can help pin down your aesthetic if you’re not sure how to describe it.
- On-site measurement and technical drawings. A professional visits, verifies every wall and pipe, and produces CAD or 3D visualizations you approve before anything is built.
- Material selection and procurement. You review real samples, approve finishes, and lock in lead times, which vary by material and supplier.
- Production and installation. Your project manager coordinates joiners, plumbers, and electricians so the vanity goes in without conflicting trade schedules.
- Final quality check. Seals, hardware, and drainage get inspected before the project is signed off.
Mida Cucine’s approach to bespoke bathroom furniture starts from layout and measurement, then uses visual proposals built from real materials before any procurement begins, a sequence that avoids the costly guesswork of ordering first and adjusting later.
Most bespoke vanity projects run from a few weeks for consultation and design approval to several more for production and install, depending on material lead times. A designer profile like Carina’s shows how this consultation-to-installation flow typically unfolds in practice, with a single project manager keeping every stage on schedule.
How Much Should a Custom Vanity Cost?
Think in ranges, not fixed numbers, until you have a scoped proposal. Entry-level bespoke vanities using laminate or melamine with a single integrated sink sit at the lower end of custom pricing. Mid-range projects, typically lacquered MDF or veneered plywood with upgraded hardware, cost more. High-end builds with stone or composite tops, custom joinery, and integrated lighting sit at the top of the range, reflecting both material cost and labor complexity.
What actually drives the number on your quote:
- Top material: laminate versus a stone or composite surface like Corian or quartz changes the budget significantly.
- Sink integration: a molded or undermount sink costs more than a drop-in basin.
- Custom hardware: soft-close mechanisms and specialty pulls add up across multiple drawers.
- Cabinetry complexity: floating designs with hidden brackets cost more in labor than a simple floor-mounted box.
- Plumbing relocation: moving a drain or supply line adds both cost and time.
Froidevaux’s positioning as a Swiss made-to-measure specialist illustrates how solid wood, Corian, and Silestone options each shift the budget conversation compared to standard laminate builds. Design fees, production, and installation are commonly quoted as separate line items, and it’s worth setting aside a 10 to 15 percent contingency for the inevitable surprise, like a pipe that sits two centimeters off from the original drawing. For a deeper walkthrough of how to structure this, see how to set a bespoke interior design budget in Switzerland.
Do You Need a Permit to Renovate a Bathroom in Rüschlikon?
Most cosmetic vanity swaps, replacing an existing cabinet, sink, or finish without moving plumbing, don’t trigger a building permit in Rüschlikon’s municipal building code. The moment your renovation touches structural walls, changes the position of drains or supply lines, or alters ventilation, that’s when you need to check with the Gemeinde Rüschlikon’s building department before work starts.
Tenants and condo owners face an added layer: many Swiss apartment associations require written approval from the building administration or Stockwerkeigentümer assembly before any plumbing relocation, even a minor one. Homeowners in a freestanding house have more latitude, but anyone near the lake shoreline or in a protected zone should confirm there are no heritage or zoning overlays that apply to their specific address.
The safest approach is to ask your designer to flag anything that might require a permit during the on-site measurement visit, before drawings are finalized rather than after. A reputable Swiss contractor working across the canton of Zürich will already know which changes are cosmetic and which require sign-off, and building that check into the early planning stage avoids a stalled project mid-installation. If your project only involves swapping the vanity itself with no plumbing changes, you’re almost always in the clear.
How Do You Vet a Custom Cabinetry Designer or Contractor?
Ask to see a real portfolio before anything else. Photos of completed bathroom vanities, ideally with a mix of styles and layouts, tell you more about a designer’s range than any sales conversation. If a contractor can’t show finished work in a bathroom setting specifically, treat that as a warning sign, since kitchen cabinetry and bathroom cabinetry face very different moisture demands.
Ask these questions before you sign anything:
- Do they measure on-site personally, or send a subcontractor who may not communicate directly with the design team?
- Do they provide 3D mockups or CAD drawings before production, so you approve the actual layout rather than a verbal description?
- Who manages the installation timeline, and is one person accountable if trades fall behind schedule?
- What warranty applies to sealing and hardware, and for how long?
Confirm whether quotes include design fees, materials, and installation as one package or as separate contracts, since a low headline number sometimes hides an installation fee billed later. A designer who manages the full arc, consultation through install, tends to catch problems (a misaligned pipe, a finish that doesn’t match the basin) before they become expensive fixes rather than after.
Should You Source Materials Locally or Import Them?
Swiss-made cabinetry, sourced from local joiners and suppliers, typically means shorter lead times and easier warranty service if something needs adjustment after install. It also tends to cost more per unit than importing equivalent panels from larger European manufacturers, since Swiss labor and production costs run higher across the board.
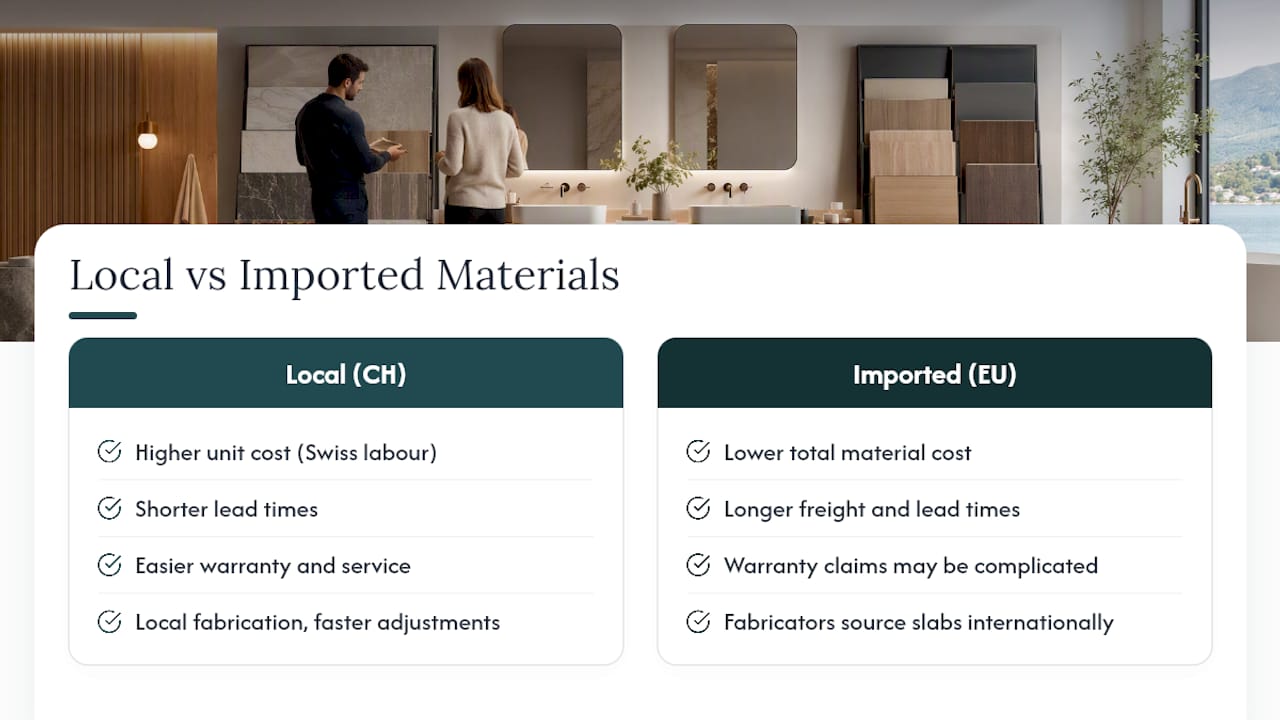
Imported materials, often sourced from Germany, Italy, or elsewhere in the EU, can lower the total material cost, but they add freight time and occasionally complicate warranty claims if a finish defect surfaces after delivery. Stone tops like Corian or Silestone are a good example: some fabricators source the raw slab internationally and finish it locally, splitting the difference between cost and turnaround.
The practical trade-off comes down to timeline sensitivity versus budget flexibility. If your bathroom is the only one in the house and you can’t be without it for long, a local supplier with faster fabrication and a shorter feedback loop on adjustments is usually worth the premium. If your timeline has flexibility, an imported top or cabinet system can meaningfully reduce the project’s material cost line without sacrificing quality, provided your designer vets the supplier’s finish standards before ordering.
What Sustainable Material Options Are Available?
Eco-conscious homeowners in Rüschlikon have more real options today than a simple “solid wood is greener” assumption suggests. FSC-certified plywood and solid wood give you a traceable supply chain, and several Swiss and European manufacturers now offer low-VOC lacquers and water-based sealants that cut down on off-gassing without sacrificing moisture resistance.
Composite stone tops made partly from recycled quartz content are another middle ground: durable enough for decades of daily use, with a lower raw-material footprint than quarried natural stone. Reclaimed wood, properly re-sealed for bathroom conditions, works well for a vanity’s exterior paneling in a powder room with lighter daily moisture exposure, though it needs more careful finish inspection than new stock.
The honest trade-off is that most sustainable options add a modest cost premium over standard melamine or basic MDF, and lead times can run longer if a supplier sources FSC-certified panels on request rather than stocking them. If sustainability is a priority, raise it at the consultation stage rather than after materials are already quoted. Retrofitting a “greener” choice into an already-priced proposal almost always costs more than building it in from the start.
How Do You Maintain a Bathroom Vanity in a Humid Climate?
Rüschlikon’s lakeside humidity and cold winters put real, repeated stress on bathroom finishes, so a maintenance routine matched to your specific material actually extends the vanity’s life by years.
- Lacquered surfaces: wipe with a soft microfiber cloth and a pH-neutral cleaner; avoid abrasive sponges that scratch the sheen.
- Veneered wood: dry any standing water immediately near the sink cutout, and reseal exposed edges every three to five years.
- Laminate and melamine: check seams annually for lifting, since this is where moisture typically finds a way in first.
- Stone or composite tops: use a stone-safe cleaner rather than bleach-based products, which can dull the surface finish over time.
- All finishes: run the bathroom fan or crack a window after every shower. Ventilation does more to protect your vanity than any sealant alone.
Pro Tip: Book a quick inspection of hardware and seals once a year, ideally before the colder months when humidity swings are sharpest. Catching a loosened hinge or a hairline seam gap early costs nothing; ignoring it for two winters often means replacing a drawer front.
Why Precise Measurement Beats a Beautiful Rendering Every Time
The conventional advice on bathroom vanities spends most of its energy on style: which finish, which hardware, which mirror shape. That’s backward. A gorgeous 3D rendering means nothing if the on-site measurement underneath it was rushed, and I’ve seen enough project post-mortems to know that the failures homeowners actually complain about are almost always fit and finish problems, not aesthetic regrets.
What the evidence in this guide actually supports is a simple hierarchy: get the measurement and sealing right first, then let style follow. A vanity with an average finish that’s sealed properly and fitted to the millimeter will outlast a stunning design with sloppy edge work or a plumbing clearance nobody double-checked. Homeowners chasing showroom photos often skip the boring parts, the pipe survey, the wall plumb check, and pay for it later in warped panels or a cabinet that never quite sat flush.
If you take one thing from this guide, prioritize the site visit and the technical drawing over the mood board. Everything else, including the parts that feel most exciting, works better once that foundation is locked down.
— Giorgia D’Amico
Ready to Design Your Vanity? Here’s the Faster Route
A DIY vanity project or a big-box cabinet retailer can get you something functional, but neither one measures your specific walls, models the layout in 3D before you commit, or manages the plumber and joiner on the same schedule. Upscale Interiors does all three as one coordinated engagement, which is the real advantage over piecing a project together yourself: one project manager, one timeline, one point of accountability if something needs adjusting mid-install.
Upscale Interiors’ interior design consultation starts with your style preferences and budget, moves through on-site measurement and 3D mockups, and ends with a fixed-scope proposal before any material gets ordered. That structure suits exactly the homeowner reading this guide: someone who wants a vanity that fits their actual bathroom, not a catalog approximation of it.
Ready to move forward? Book a consultation and bring your photos, rough measurements, and budget range. That’s enough for a designer to start shaping a real proposal.
Sources
- Geberit
- Möbel, Licht und Spiegel | LAUFEN Schweiz
- Badmöbel Schweiz nach Mass | Froidevaux – 60 Jahre Qualität
Recommended
- Interior Design Lenzerheide | Designers d’intérieur suisses — Upscale Interiors
- Interior Design Zurich | Designers d’intérieur suisses — Upscale Interiors
- Badgestaltung: Tipps und Ideen für Ihr Traumbad | upscale Interiors